<?xml version="1.0" encoding="utf-8"?>
<feed xmlns="http://www.w3.org/2005/Atom" xml:lang="en">
  <generator uri="https://jekyllrb.com/" version="4.4.1">Jekyll</generator>
  <link href="https://montedelgallo.com/feed.xml" rel="self" type="application/atom+xml" />
  <link href="https://montedelgallo.com/blog/" rel="alternate" type="text/html" hreflang="en" />
  <updated>2026-10-17T11:44:22+00:00</updated>
  <id>https://montedelgallo.com/feed.xml</id>
  <title type="html">Monte del Gallo · Articles from the team.</title>
  <subtitle>Notes on how we build software, the products we try on the side and the people who join us.</subtitle>
  <entry xml:lang="en">
    <title type="html">Saladil: Revolutionizing WordPress Support, One Ticket at a Time</title>
    <link href="https://montedelgallo.com/blog/saladil-revolutionizing-wordpress-support-one-ticket-at-a-time/" rel="alternate" type="text/html" title="Saladil: Revolutionizing WordPress Support, One Ticket at a Time" />
    <published>2024-09-24T10:33:27+00:00</published>
    <updated>2024-09-24T10:33:27+00:00</updated>
    <id>https://montedelgallo.com/blog/saladil-revolutionizing-wordpress-support-one-ticket-at-a-time/</id>
    <author>
      <name>Giovanni Panasiti</name>
    </author>
    <category term="products" />
    <summary type="html">Saladil is a fresh take on what a ticketing system for WordPress should be: a SaaS application that connects to your site with a simple plugin, so users can ask for support without ever leaving it.</summary>
    <content type="html" xml:base="https://montedelgallo.com/blog/saladil-revolutionizing-wordpress-support-one-ticket-at-a-time/"><![CDATA[<p>We’ve all been there. You’re navigating a website, run into a snag, and need assistance. But the moment you click “Support,” you’re whisked away to some external site or clunky help desk that feels like a different universe. It’s jarring. It disrupts the flow. It doesn’t have to be this way.</p>

<p>Enter <strong>Saladil</strong>.</p>

<p>Saladil isn’t just another support tool. It’s a fresh take on what a ticketing system for WordPress should be. Seamless. Integrated. User-friendly. It’s a SaaS application that connects to your WordPress site via a simple plugin, allowing your users to request support without ever leaving your digital front porch.</p>

<p>Why is this a game-changer?</p>

<p>Because user experience matters more than ever. In a world where attention spans are measured in seconds, every click counts. Forcing users to jump through hoops just to get help is a surefire way to lose them. Saladil eliminates that friction. It keeps your users where they want to be—on your site, engaged with your content, feeling supported.</p>

<p>Installation is a breeze. No need to wrangle with convoluted setups or decipher arcane documentation. Download the plugin, connect it to your Saladil account, and you’re off to the races. In minutes, you’ve transformed your WordPress site into a fully-equipped support hub.</p>

<p>But let’s talk about what really sets Saladil apart.</p>

<p>It’s not bloated with unnecessary features that look good on paper but add complexity in practice. Instead, it focuses on doing the essentials exceptionally well. Ticket management is intuitive. Your support team can track, prioritize, and resolve issues with ease. Users get timely responses without the labyrinth of traditional help desks.</p>

<p>Communication is clear and direct. No more emails lost in spam folders or buried in threads. Saladil centralizes interactions, making it easier for everyone to stay on the same page. And because it’s all embedded within your site, the branding stays consistent. Your users feel like they’re in good hands, not passed off to some faceless third-party platform.</p>

<p>In an era where plugins and add-ons can bog down your WordPress site, efficiency is key. Saladil is lightweight. It doesn’t hog resources or slow down load times. It’s been crafted to integrate smoothly, respecting the delicate balance of performance and functionality.</p>

<p>Let’s face it: the support landscape is cluttered. So many solutions promise the moon but deliver a confusing mess of features that nobody asked for. Saladil cuts through the noise. It understands that the core of support is connection—between you and your users, without barriers.</p>

<p>Think about the time and energy saved when your support system just works. When your team isn’t wrestling with clumsy interfaces, they can focus on what truly matters: resolving issues and building relationships. When your users find help effortlessly, they’re more likely to stick around, to trust, to become advocates for your brand.</p>

<p>Saladil embodies a philosophy that’s often overlooked: simplicity scales. By honing in on what’s essential and stripping away the excess, it provides a platform that’s both powerful and approachable. It’s the kind of tool that makes you wonder how you ever managed without it.</p>

<p>So, if you’re tired of the status quo—of support systems that overpromise and underdeliver—it’s time to give Saladil a spin. Let your WordPress site be more than just a destination. Make it a place where users feel heard, valued, and supported, all without skipping a beat.</p>

<p>In the end, it’s about forging stronger connections. Saladil gets that. Do you?</p>
]]></content>
  </entry>
  <entry xml:lang="en">
    <title type="html">Ace Your React Interview: Comprehensive Guide &amp;amp; Key Concepts</title>
    <link href="https://montedelgallo.com/blog/get-ready-for-your-next-react-job-interview/" rel="alternate" type="text/html" title="Ace Your React Interview: Comprehensive Guide &amp;amp; Key Concepts" />
    <published>2023-08-24T11:33:51+00:00</published>
    <updated>2023-08-24T11:33:51+00:00</updated>
    <id>https://montedelgallo.com/blog/get-ready-for-your-next-react-job-interview/</id>
    <author>
      <name>Giovanni Panasiti</name>
    </author>
    <category term="frontend" />
    <summary type="html">A curated collection of over 30 questions that frequently surface in React interviews, with succinct answers that show React’s core principles and its advanced nuances.</summary>
    <content type="html" xml:base="https://montedelgallo.com/blog/get-ready-for-your-next-react-job-interview/"><![CDATA[<p>In today’s competitive tech landscape, a successful interview often hinges not just on your skills, but on your preparation. React, as one of the leading libraries in front-end development, frequently sits at the center of such interviews, and the questions can range from basic to deeply intricate. “Ace Your React Interview: Comprehensive Guide &amp; Key Concepts” is tailored for those aspiring to shine in such pivotal moments.</p>

<p>Within this guide, you’ll find a curated collection of over 30 pivotal questions that frequently surface in React interviews. But, more than just questions, we provide you with succinct, articulate answers that showcase a profound understanding of React’s core principles and advanced nuances. Think of this not just as a study guide, but as a blueprint to articulate your React expertise confidently and convincingly. Whether you’re an experienced developer aiming to refresh your knowledge, or you’re stepping into the React realm for the first time, this guide is your ally. Let’s ensure that when the spotlight is on, you’re not only ready but poised to impress.</p>

<h2 id="questions">Questions</h2>

<ul>
  <li>Explain what is the Virtual DOM in React</li>
  <li>What are the differences between the Virtual DOM and the DOM?</li>
  <li>What is JSX?</li>
  <li>What do you understand when we talk about Render in React?</li>
  <li>Explain the concept of Components in React</li>
  <li>What are props in React and what are the main differences with state?</li>
  <li>Props:</li>
  <li>State:</li>
  <li>How can you update the state of a component?</li>
  <li>Class Components:</li>
  <li>Functional Components:</li>
  <li>What are synthethic events in React?</li>
  <li>What are refs in React, give an example of when would you use one.</li>
  <li>How does React render process work?</li>
  <li>What are keys in React and why are they important?</li>
  <li>How can you reuse logic in functional components?</li>
  <li>What is the difference between a controlled and uncontrolled component in React?</li>
  <li>Explain the main difference between server side rendering and client side rendering in React</li>
  <li>How would you avoid unnecessary renders in a React component?</li>
  <li>What is a Portal in React?</li>
  <li>State the main difference between useEffect and useLayoutEffect</li>
  <li>Where do you usually fetch data in React?</li>
  <li>What are hooks in React?</li>
  <li>If you wanted a component to perform an action only once when the component initially rendered how would you achieve it</li>
  <li>with a function component?</li>
  <li>What is prop-drilling, and how can you avoid it?</li>
  <li>How can you reset a component’s state to its initial state?</li>
  <li>Explain the difference between useState and useEffect.</li>
  <li>If you have to set a key value in a component, from where would you get that value?</li>
  <li>Explain the concept of lazy loading React components</li>
  <li>Explain the main differences between useMemo and useCallback</li>
  <li>Why would you ever use forwardRef in React?</li>
  <li>At what point does the useEffect cleanup function run?</li>
  <li>Explain the concept of Reducers and Context in React</li>
  <li>How would you catch render errors in React components at the global scope?</li>
  <li>How does useEffect check changes in its array dependency?</li>
</ul>

<h3 id="explain-what-is-the-virtual-dom-in-react">Explain what is the Virtual DOM in React</h3>

<p>The <strong>Virtual DOM</strong> in React is a <strong>lightweight representation</strong> of the actual DOM elements. The rendering engine can quickly make changes to the Virtual DOM and then subsequently update the real DOM in a more efficient and optimized way. The primary benefit is that it <strong>minimizes direct manipulations</strong> of the actual DOM, resulting in <strong>faster and smoother updates</strong> to the user interface.</p>

<h3 id="what-are-the-differences-between-the-virtual-dom-and-the-dom">What are the differences between the Virtual DOM and the DOM?</h3>

<p>The <strong>Virtual DOM</strong> and the <strong>DOM</strong> are both critical concepts in web development, especially when working with React. Here are their primary differences:</p>

<ul>
  <li><strong>Representation:</strong> The <strong>DOM</strong> (Document Object Model) is a programming interface and structured representation of a webpage, allowing developers to interact with and manipulate the page content, structure, and styles. On the other hand, the <strong>Virtual DOM</strong> is a <strong>lightweight</strong> copy of the actual DOM in React, which helps in determining the most efficient way to update the real DOM.</li>
  <li><strong>Efficiency:</strong> Directly manipulating the DOM can be slow and inefficient, especially with frequent changes. The <strong>Virtual DOM</strong> enables React to determine the minimal number of DOM changes required by comparing the current Virtual DOM with the next version (a process called <strong>diffing</strong>) and then applying only the necessary updates.</li>
  <li><strong>Existence:</strong> While the <strong>DOM</strong> is a standard that exists in all web browsers, the <strong>Virtual DOM</strong> is specific to React and certain other modern web libraries or frameworks.</li>
</ul>

<p>Here’s a basic code illustration to emphasize the concept:</p>

<div class="language-plaintext highlighter-rouge"><div class="highlight"><pre class="highlight"><code>// Traditional DOM manipulation:
const element = document.createElement('div');
element.textContent = 'Hello, DOM!';
document.body.appendChild(element);

// React's way using Virtual DOM:
import React from 'react';
function App() {
    return &lt;div&gt;Hello, Virtual DOM!&lt;/div&gt;;
}
</code></pre></div></div>

<h3 id="what-is-jsx">What is JSX?</h3>

<p><strong>JSX</strong>, or JavaScript XML, is a syntax extension for JavaScript, predominantly used with React. It allows developers to write HTML-like code within their JavaScript code, leading to a more intuitive and readable way to describe the UI components.</p>

<ul>
  <li><strong>Combination:</strong> JSX essentially allows you to combine JavaScript and HTML. This synergy makes it easier to visualize the UI structure directly within the component logic.</li>
  <li><strong>Transpilation:</strong> Browsers don’t natively understand JSX. Therefore, tools like <strong>Babel</strong> are used to transpile JSX into regular JavaScript code that browsers can interpret.</li>
  <li><strong>Components:</strong> With JSX, React components can be defined using a syntax that’s visually similar to HTML, making it straightforward to define and understand the component’s structure.</li>
</ul>

<p>Here’s a simple illustration of JSX in action:</p>

<div class="language-plaintext highlighter-rouge"><div class="highlight"><pre class="highlight"><code>// Without JSX:
React.createElement('div', { className: 'greeting' }, 'Hello, world!');

// With JSX:
&lt;div className="greeting"&gt;Hello, world!&lt;/div&gt;
</code></pre></div></div>

<p>Notice how the JSX version is more concise and resembles traditional HTML, offering better readability.</p>

<h3 id="what-do-you-understand-when-we-talk-about-render-in-react">What do you understand when we talk about Render in React?</h3>

<p>In React, when we talk about <strong>render</strong>, we are referring to the process of translating the application’s state and props into a visual representation within the browser. Rendering determines how the UI should look based on the data available to the component.</p>

<ul>
  <li><strong>Initial Render:</strong> The first time a React component is added to the DOM, it undergoes an initial render, creating the visual output for the user.</li>
  <li><strong>Re-rendering:</strong> When there are changes in the component’s state or props, React determines if an update to the UI is required. If needed, a re-render is triggered to reflect the changes.</li>
  <li><strong>Virtual DOM:</strong> Instead of making direct changes to the real DOM, React first updates the Virtual DOM. It then compares (or “diffs”) the current Virtual DOM with the new one and calculates the most efficient way to make changes to the real DOM.</li>
</ul>

<p>Here’s a basic example illustrating the rendering process in a React component:</p>

<div class="language-plaintext highlighter-rouge"><div class="highlight"><pre class="highlight"><code>import React, { useState } from 'react';

function Counter() {
  const [count, setCount] = useState(0);

  return (
    &lt;div&gt;
      &lt;p&gt;You clicked {count} times&lt;/p&gt;
      &lt;button onClick={() =&gt; setCount(count + 1)}&gt;
        Click me
      &lt;/button&gt;
    &lt;/div&gt;
  );
}
</code></pre></div></div>

<p>Every time the button in the <code class="language-plaintext highlighter-rouge">Counter</code> component is clicked, the state (<code class="language-plaintext highlighter-rouge">count</code>) changes, which triggers a re-render to update the displayed click count.</p>

<h3 id="explain-the-concept-of-components-in-react">Explain the concept of Components in React</h3>

<p>In React, <strong>Components</strong> are the building blocks of the user interface. They allow you to split the UI into independent, reusable pieces, and think about each piece in isolation. Components can be likened to custom HTML elements with their own structure, logic, and behavior.</p>

<ul>
  <li><strong>Reusable:</strong> Components can be reused across different parts of an application. This promotes a DRY (Don’t Repeat Yourself) principle.</li>
  <li><strong>Stateful and Stateless:</strong> Components can either maintain their own data state (stateful) or receive data entirely through props (stateless).</li>
  <li><strong>Class and Functional:</strong> Historically, components were primarily class-based, but with the introduction of React hooks, functional components can now manage state and side effects as well.</li>
  <li><strong>Composition:</strong> Components can be nested within other components, enabling the creation of more complex UIs through composition.</li>
</ul>

<p>Here’s a basic example of a React component:</p>

<div class="language-plaintext highlighter-rouge"><div class="highlight"><pre class="highlight"><code>// Functional Component
function Greeting(props) {
  return &lt;h1&gt;Hello, {props.name}!&lt;/h1&gt;;
}
</code></pre></div></div>

<p>And using the component:</p>

<div class="language-plaintext highlighter-rouge"><div class="highlight"><pre class="highlight"><code>&lt;Greeting name="John" /&gt;
</code></pre></div></div>

<p>This would render the text “Hello, John!” on the screen. The component encapsulates the logic and structure needed to create this piece of the UI, making it easy to reuse wherever a greeting is needed.</p>

<h3 id="what-are-props-in-react-and-what-are-the-main-differences-with-state">What are props in React and what are the main differences with state?</h3>

<p>In React, <strong>props</strong> (short for “properties”) and <strong>state</strong> are two key concepts that help manage data in a component. While they both hold information that influences the output of a render, they serve different purposes and have distinct characteristics.</p>

<h3 id="props">Props:</h3>

<ul>
  <li><strong>Immutable:</strong> Props are <strong>read-only</strong>. This means a component should never modify its own props.</li>
  <li><strong>Passed from Parent:</strong> Props are passed to a component from its parent component. They allow components to communicate with each other.</li>
  <li><strong>External Data:</strong> Think of props as arguments or parameters you pass to a function.</li>
</ul>

<h3 id="state">State:</h3>

<ul>
  <li><strong>Mutable:</strong> State is <strong>changeable</strong> data. When state changes in a component, the component re-renders.</li>
  <li><strong>Internal Data:</strong> State represents data that a component’s event handlers may change to trigger a user interface update.</li>
  <li><strong>Lifecycle:</strong> State can have a lifecycle, with mounting, updating, and unmounting phases.</li>
</ul>

<p>Highlighting the differences:</p>

<div class="language-plaintext highlighter-rouge"><div class="highlight"><pre class="highlight"><code>// Using props
function Welcome(props) {
  return &lt;h1&gt;Hello, {props.name}&lt;/h1&gt;;
}

// Using state
class Counter extends React.Component {
  constructor(props) {
    super(props);
    this.state = { count: 0 };
  }

  increment = () =&gt; {
    this.setState({ count: this.state.count + 1 });
  }

  render() {
    return (
      &lt;div&gt;
        &lt;p&gt;Count: {this.state.count}&lt;/p&gt;
        &lt;button onClick={this.increment}&gt;Increment&lt;/button&gt;
      &lt;/div&gt;
    );
  }
}
</code></pre></div></div>

<p>In the first example, the <code class="language-plaintext highlighter-rouge">Welcome</code> component receives the name to display via props. In the second example, the <code class="language-plaintext highlighter-rouge">Counter</code> component maintains its own count in the state, which can be changed using the increment function.</p>

<h3 id="how-can-you-update-the-state-of-a-component">How can you update the state of a component?</h3>

<p>Updating the <strong>state</strong> of a component in React is crucial for ensuring that the user interface remains in sync with the underlying data. In React, you should never directly modify the state. Instead, you use the <strong>setState</strong> method (in class components) or the <strong>useState</strong> hook (in functional components) to update the state.</p>

<h3 id="class-components">Class Components:</h3>

<p>In class components, the <strong>setState</strong> method is used:</p>

<div class="language-plaintext highlighter-rouge"><div class="highlight"><pre class="highlight"><code>class Counter extends React.Component {
  constructor(props) {
    super(props);
    this.state = { count: 0 };
  }

  handleIncrement = () =&gt; {
    this.setState({ count: this.state.count + 1 });
  }

  render() {
    return (
      &lt;div&gt;
        &lt;p&gt;Count: {this.state.count}&lt;/p&gt;
        &lt;button onClick={this.handleIncrement}&gt;Increment&lt;/button&gt;
      &lt;/div&gt;
    );
  }
}
</code></pre></div></div>

<h3 id="functional-components">Functional Components:</h3>

<p>In functional components, the <strong>useState</strong> hook is commonly used to manage state:</p>

<div class="language-plaintext highlighter-rouge"><div class="highlight"><pre class="highlight"><code>import React, { useState } from 'react';

function Counter() {
  const [count, setCount] = useState(0);

  const handleIncrement = () =&gt; {
    setCount(count + 1);
  }

  return (
    &lt;div&gt;
      &lt;p&gt;Count: {count}&lt;/p&gt;
      &lt;button onClick={handleIncrement}&gt;Increment&lt;/button&gt;
    &lt;/div&gt;
  );
}
</code></pre></div></div>

<p>In both examples, the state update functions (<strong>setState</strong> and <strong>setCount</strong>) trigger a re-render of the component, ensuring the displayed count reflects the updated state.</p>

<h3 id="what-are-synthethic-events-in-react">What are synthethic events in React?</h3>

<p>In React, <strong>Synthetic Events</strong> are wrappers around the browser’s native events. They aim to provide a consistent event system across different browsers, ironing out any inconsistencies and ensuring a unified behavior in your application.</p>

<ul>
  <li><strong>Cross-Browser Compatibility:</strong> Synthetic Events encapsulate the behavior of native browser events, offering the same interface regardless of underlying browser differences.</li>
  <li><strong>Performance:</strong> React reuses synthetic event objects for better performance. This reduces the overhead of creating a new event object for every event.</li>
  <li><strong>Pooling:</strong> After the event callback has been invoked, React “pools” the synthetic events, nullifying their properties. This ensures a reduced memory footprint.</li>
  <li><strong>Consistent Properties:</strong> Properties and methods on the synthetic event are consistent across different browsers.</li>
</ul>

<p>Here’s an example showcasing the use of a synthetic event:</p>

<div class="language-plaintext highlighter-rouge"><div class="highlight"><pre class="highlight"><code>import React from 'react';

function ClickableComponent() {
  const handleClick = (event) =&gt; {
    event.preventDefault(); // Using a synthetic event method
    console.log(event.type); // Outputs: "click"
  }

  return (
    &lt;a href="https://www.example.com" onClick={handleClick}&gt;
      Click Me
    &lt;/a&gt;
  );
}
</code></pre></div></div>

<p>In the example above, the <code class="language-plaintext highlighter-rouge">handleClick</code> function receives a synthetic event object when the link is clicked. This ensures that the event behavior is consistent, no matter which browser the code runs in.</p>

<h3 id="what-are-refs-in-react-give-an-example-of-when-would-you-use-one">What are refs in React, give an example of when would you use one.</h3>

<p>In React, <strong>refs</strong> (short for “references”) provide a way to directly access the DOM elements or React elements created in the render method. This is useful in cases where you need to bypass the typical data flow mechanisms of React, such as when you need to focus an input element, trigger imperative animations, or integrate with third-party libraries.</p>

<ul>
  <li><strong>Direct Access:</strong> Refs allow direct access to DOM elements, which is generally discouraged in favor of a declarative approach, but can be essential in some situations.</li>
  <li><strong>Avoid Overuse:</strong> It’s important to avoid overusing refs. React’s declarative approach usually negates the need for them. Use them as a last resort or in scenarios where their necessity is clear.</li>
  <li><strong>createRef and useRef:</strong> Refs can be created using <code class="language-plaintext highlighter-rouge">React.createRef()</code> in class components and <code class="language-plaintext highlighter-rouge">useRef()</code> hook in functional components.</li>
</ul>

<p>Here’s an example showcasing the use of refs to focus on an input element:</p>

<div class="language-plaintext highlighter-rouge"><div class="highlight"><pre class="highlight"><code>import React, { useRef, useEffect } from 'react';

function FocusInput() {
  // Create a ref object
  const inputRef = useRef(null);

  useEffect(() =&gt; {
    // Focus the input element when the component mounts
    inputRef.current.focus();
  }, []);

  return (
    &lt;input ref={inputRef} type="text" placeholder="I will be focused on mount" /&gt;
  );
}
</code></pre></div></div>

<p>In this example, as soon as the <code class="language-plaintext highlighter-rouge">FocusInput</code> component mounts, the input element is automatically focused using the ref. This illustrates a common use-case for refs: controlling focus programmatically.</p>

<h3 id="how-does-react-render-process-work">How does React render process work?</h3>

<p>The <strong>React render process</strong> is a sequence of steps the library follows to convert React components into a visual representation in the browser. It’s optimized for performance and ensures efficient updates to the UI. Here’s a simplified breakdown:</p>

<ol>
  <li><strong>JSX Compilation:</strong> During the development phase, JSX (an XML-like syntax extension for JavaScript) is compiled into regular JavaScript using tools like Babel. It gets transformed into <code class="language-plaintext highlighter-rouge">React.createElement()</code> calls.</li>
  <li><strong>Initial Render:</strong> When a React application starts, it goes through the initial rendering phase. All components return their defined output (typically other components, HTML elements, etc.).</li>
  <li><strong>Virtual DOM Creation:</strong> React creates a lightweight representation of the output, known as the Virtual DOM. This allows React to determine changes in an optimized manner.</li>
  <li><strong>Reconciliation:</strong> When there’s a change in state or props, React triggers a re-render. Instead of updating the real DOM directly, React first updates the Virtual DOM.</li>
  <li><strong>Diffing:</strong> React compares (or “diffs”) the previous Virtual DOM with the new one to determine the most efficient series of changes.</li>
  <li><strong>Committing Updates:</strong> After calculating the necessary changes, React updates the real DOM. This is the phase where users see updates on their screen.</li>
  <li><strong>Batching:</strong> To further enhance performance, React batches multiple <code class="language-plaintext highlighter-rouge">setState()</code> calls together into a single update, reducing the number of DOM manipulations.</li>
  <li><strong>Component Lifecycle:</strong> Throughout the render process, React components go through a series of lifecycle methods (in class components) or effects (in functional components with hooks) allowing developers to plug in code at specific points.</li>
</ol>

<p>By following this process, React ensures the UI remains responsive and updates efficiently, avoiding unnecessary computations or DOM updates.</p>

<h3 id="what-are-keys-in-react-and-why-are-they-important">What are keys in React and why are they important?</h3>

<p>In React, <strong>keys</strong> are special attributes you should provide when creating lists of elements. They help React identify which items have been added, changed, or removed, and they play a crucial role in optimizing the performance of updates, especially in lists or dynamic content.</p>

<ul>
  <li><strong>Identity:</strong> Keys give elements a stable identity. They should be unique among siblings but don’t need to be globally unique.</li>
  <li><strong>Reconciliation Process:</strong> During React’s reconciliation (diffing) process, keys help to correctly match elements in the original tree structure with those in the subsequent tree.</li>
  <li><strong>Performance:</strong> Without keys, React might need to re-render more components than necessary, leading to decreased performance.</li>
  <li><strong>Stateful Components:</strong> Using keys ensures that the state associated with an item is maintained even when the order changes or items are added/removed.</li>
</ul>

<p>Here’s a basic example illustrating the use of keys:</p>

<div class="language-plaintext highlighter-rouge"><div class="highlight"><pre class="highlight"><code>import React from 'react';

function ItemList(props) {
  const items = props.items;

  return (
    &lt;ul&gt;
      {items.map(item =&gt;
        &lt;li key={item.id}&gt;{item.name}&lt;/li&gt;
      )}
    &lt;/ul&gt;
  );
}
</code></pre></div></div>

<p>In this example, each item has a unique <code class="language-plaintext highlighter-rouge">id</code> that is used as the key. This ensures that React can efficiently determine changes in the list and update the DOM accordingly.</p>

<p><strong>Note:</strong> It’s generally discouraged to use indexes as keys if the list can change over time. This can lead to bugs and negatively impact performance.</p>

<h3 id="how-can-you-reuse-logic-in-functional-components">How can you reuse logic in functional components?</h3>

<p>In React, when working with functional components, the primary way to reuse logic is through the use of <strong>custom hooks</strong>. Custom hooks allow you to extract component logic into reusable functions.</p>

<ul>
  <li><strong>Custom Hooks:</strong> They are JavaScript functions that can use other hooks. By convention, they start with the word <code class="language-plaintext highlighter-rouge">use</code>, and they allow you to share and reuse stateful logic across different components.</li>
  <li><strong>Isolation:</strong> Custom hooks allow for better isolation and testing of logic, making your components cleaner and easier to maintain.</li>
  <li><strong>Composition:</strong> Multiple custom hooks can be combined to create more complex functionality, making them composable.</li>
</ul>

<p>Here’s a simple example illustrating the use of custom hooks:</p>

<div class="language-plaintext highlighter-rouge"><div class="highlight"><pre class="highlight"><code>import { useState } from 'react';

// Custom hook to handle input changes
function useInput(initialValue) {
  const [value, setValue] = useState(initialValue);
  const handleChange = (e) =&gt; {
    setValue(e.target.value);
  };

  return [value, handleChange];
}

function MyComponent() {
  const [username, handleUsernameChange] = useInput('');
  const [email, handleEmailChange] = useInput('');

  return (
    &lt;div&gt;
      &lt;input value={username} onChange={handleUsernameChange} placeholder="Username" /&gt;
      &lt;input value={email} onChange={handleEmailChange} placeholder="Email" /&gt;
    &lt;/div&gt;
  );
}
</code></pre></div></div>

<p>In the example above, the <code class="language-plaintext highlighter-rouge">useInput</code> custom hook manages the state and change logic of an input field. By using this custom hook, we can avoid repeating the same logic for different input fields, showcasing the power of reusable logic in functional components.</p>

<h3 id="what-is-the-difference-between-a-controlled-and-uncontrolled-component-in-react">What is the difference between a controlled and uncontrolled component in React?</h3>

<p>In React, components that handle form elements can be classified into two categories: <strong>controlled</strong> and <strong>uncontrolled</strong> components.</p>

<ul>
  <li><strong>Controlled Components:</strong>
    <ul>
      <li>In a controlled component, the form data is managed by the React state. The value of the input is always driven by the React state.</li>
      <li>Whenever there’s a change in the input, a handler function (like <code class="language-plaintext highlighter-rouge">onChange</code>) is invoked to update the state, which in turn updates the input’s value.</li>
      <li>It offers more predictability and can be directly influenced by the component’s state.</li>
    </ul>
  </li>
  <li><strong>Uncontrolled Components:</strong>
    <ul>
      <li>In an uncontrolled component, the form data is managed by the DOM itself, not by the React state.</li>
      <li>To get the value from an input in an uncontrolled component, you’d use a ref to directly access the DOM element.</li>
      <li>They are similar to traditional HTML form inputs and might be simpler for integrating React with non-React code.</li>
    </ul>
  </li>
</ul>

<p>Here’s a comparison with examples:</p>

<div class="language-plaintext highlighter-rouge"><div class="highlight"><pre class="highlight"><code>// Controlled Component
function ControlledInput() {
  const [value, setValue] = useState('');

  return (
    &lt;input value={value} onChange={e =&gt; setValue(e.target.value)} /&gt;
  );
}

// Uncontrolled Component
function UncontrolledInput() {
  const inputRef = useRef(null);

  const showAlert = () =&gt; {
    alert(inputRef.current.value);
  }

  return (
    &lt;div&gt;
      &lt;input ref={inputRef} /&gt;
      &lt;button onClick={showAlert}&gt;Show Value&lt;/button&gt;
    &lt;/div&gt;
  );
}
</code></pre></div></div>

<p>Generally, controlled components are recommended in React as they allow for more predictable behavior and better integration with React’s declarative nature.</p>

<h3 id="explain-the-main-difference-between-server-side-rendering-and-client-side-rendering-in-react">Explain the main difference between server side rendering and client side rendering in React</h3>

<p>In the context of React applications, rendering can occur either on the server or the client side. The choice between <strong>Server Side Rendering (SSR)</strong> and <strong>Client Side Rendering (CSR)</strong> can significantly impact performance, SEO, and user experience. Here are the primary differences:</p>

<ul>
  <li><strong>Server Side Rendering (SSR):</strong>
    <ul>
      <li>The React components are rendered on the server into a static HTML string.</li>
      <li>Users see the content faster as the server sends the rendered page directly. This can result in a faster <strong>First Contentful Paint (FCP)</strong>.</li>
      <li>It can be beneficial for SEO, as search engine crawlers receive a fully rendered page.</li>
      <li>Popular frameworks like <strong>Next.js</strong> simplify the SSR process for React applications.</li>
      <li>Requires a server to process requests, which can lead to increased server load.</li>
    </ul>
  </li>
  <li><strong>Client Side Rendering (CSR):</strong>
    <ul>
      <li>The React components are rendered directly in the browser. Initially, the server sends a blank or loading page, and the actual content is populated as the JavaScript executes.</li>
      <li>It might result in a slower initial page load, as the browser has to load, parse, and execute the JavaScript before displaying content.</li>
      <li>Once loaded, navigating between pages or views can be faster due to the assets and React being already in memory.</li>
      <li>SEO might be more challenging (though search engines have gotten better at indexing JavaScript applications).</li>
      <li>Frameworks like <strong>Create React App</strong> set up CSR-based React applications.</li>
    </ul>
  </li>
</ul>

<p>In practice, many applications leverage a combination of both, known as <strong>Hybrid Rendering</strong>, to optimize performance, SEO, and user experience. They may use SSR for the initial load and CSR for subsequent dynamic updates.</p>

<h3 id="how-would-you-avoid-unnecessary-renders-in-a-react-component">How would you avoid unnecessary renders in a React component?</h3>

<p>Ensuring efficient rendering is key to maximizing the performance of React applications. Unnecessary renders can slow down the app and lead to a poor user experience. Here are ways to avoid them:</p>

<ul>
  <li><strong>Use PureComponent:</strong>
    <ul>
      <li>If you’re using class components, extend <code class="language-plaintext highlighter-rouge">PureComponent</code> instead of <code class="language-plaintext highlighter-rouge">Component</code>. This ensures a shallow comparison of state and props, preventing unnecessary renders when data hasn’t changed.</li>
    </ul>
  </li>
  <li><strong>Utilize React.memo:</strong>
    <ul>
      <li>For functional components, wrap your component with <code class="language-plaintext highlighter-rouge">React.memo</code>. It’s similar to <code class="language-plaintext highlighter-rouge">PureComponent</code> and does a shallow comparison of props.</li>
    </ul>
  </li>
  <li><strong>Optimize state and props:</strong>
    <ul>
      <li>Ensure that you’re only updating state or props when necessary. Avoid creating new references (objects or arrays) unless there’s a change in the data.</li>
    </ul>
  </li>
  <li><strong>Use Callbacks Wisely:</strong>
    <ul>
      <li>
        <p>Use the <code class="language-plaintext highlighter-rouge">useCallback</code> hook to memoize callback functions, preventing them from being recreated every render.</p>

        <div class="language-plaintext highlighter-rouge"><div class="highlight"><pre class="highlight"><code>const increment = useCallback(() =&gt; {
  setCount(prevCount =&gt; prevCount + 1);
}, []);
</code></pre></div>        </div>
      </li>
    </ul>
  </li>
  <li><strong>Memoize Computations:</strong>
    <ul>
      <li>
        <p>If you have computations derived from state or props, use the <code class="language-plaintext highlighter-rouge">useMemo</code> hook to ensure they’re recalculated only when necessary.</p>

        <div class="language-plaintext highlighter-rouge"><div class="highlight"><pre class="highlight"><code>const doubledValue = useMemo(() =&gt; {
  return value * 2;
}, [value]);
</code></pre></div>        </div>
      </li>
    </ul>
  </li>
  <li><strong>Use Context Sparingly:</strong>
    <ul>
      <li>Remember that any value change in a <code class="language-plaintext highlighter-rouge">React.Context</code> will re-render all components consuming that context. Break contexts into smaller parts if possible or use libraries like <code class="language-plaintext highlighter-rouge">react-query</code> for more granular control.</li>
    </ul>
  </li>
  <li><strong>Profile with DevTools:</strong>
    <ul>
      <li>Use the React DevTools’ profiler to inspect which components are re-rendering and why. This helps in identifying bottlenecks and optimizing renders.</li>
    </ul>
  </li>
</ul>

<p>By being mindful of renders and employing optimization techniques, you can ensure a smooth and responsive user experience.</p>

<h3 id="what-is-a-portal-in-react">What is a Portal in React?</h3>

<p>In React, a <strong>Portal</strong> provides a way to render children outside the parent DOM hierarchy, yet it retains the same context and event bubbling behavior as if they were inside the parent. This is particularly useful for UI elements like modals, popups, and tooltips which might be visually positioned outside the component but need to stay within the React component logic.</p>

<ul>
  <li><strong>Advantages:</strong>
    <ul>
      <li>It can help with CSS styling issues, especially with z-index or overflow problems.</li>
      <li>It ensures that the component’s behavior remains consistent, even if visually rendered outside the main UI tree.</li>
    </ul>
  </li>
  <li><strong>Usage:</strong>
    <ul>
      <li>
        <p>React provides a <code class="language-plaintext highlighter-rouge">ReactDOM.createPortal()</code> method for this purpose.</p>

        <div class="language-plaintext highlighter-rouge"><div class="highlight"><pre class="highlight"><code>import ReactDOM from 'react-dom';

function Modal(props) {
  return ReactDOM.createPortal(
    &lt;div className="modal"&gt;
      {props.children}
    &lt;/div&gt;,
    document.getElementById('modal-root')
  );
}
</code></pre></div>        </div>
      </li>
      <li>
        <p>In the example above, the <code class="language-plaintext highlighter-rouge">Modal</code> component renders its children into a <code class="language-plaintext highlighter-rouge">modal-root</code> DOM node outside the main app hierarchy.</p>
      </li>
    </ul>
  </li>
</ul>

<p>Using Portals efficiently can greatly simplify the implementation and improve the behavior of overlays and floating UI elements in a React application.</p>

<h3 id="state-the-main-difference-between-useeffect-and-uselayouteffect">State the main difference between useEffect and useLayoutEffect</h3>

<p><strong>useEffect</strong> and <strong>useLayoutEffect</strong> are both hooks in React that allow you to perform side effects in function components. However, they differ primarily in the timing of their execution in relation to rendering:</p>

<ul>
  <li><strong>useEffect:</strong>
    <ul>
      <li>It runs asynchronously and after the browser has painted the updated screen.</li>
      <li>Typically used for most side effects, such as data fetching, setting up subscriptions, etc.</li>
      <li>Doesn’t block the browser from updating the screen.</li>
    </ul>
  </li>
  <li><strong>useLayoutEffect:</strong>
    <ul>
      <li>It runs synchronously after all DOM mutations but before the screen is updated or painted.</li>
      <li>Useful when you need to make DOM measurements or updates and want to ensure they occur before the screen is repainted, preventing flickers.</li>
      <li>Should be used sparingly as it can block the render process.</li>
    </ul>
  </li>
</ul>

<p>In most scenarios, <code class="language-plaintext highlighter-rouge">useEffect</code> is sufficient and should be preferred due to its non-blocking nature. <code class="language-plaintext highlighter-rouge">useLayoutEffect</code> is used for more specific cases where the effect must be synchronized with the layout phase.</p>

<h3 id="where-do-you-usually-fetch-data-in-react">Where do you usually fetch data in React?</h3>

<p>In React, data fetching commonly occurs in the <strong>component lifecycle methods</strong> (for class components) or within the <strong>effect hooks</strong> (for functional components). Here’s how it’s typically done in each approach:</p>

<ul>
  <li><strong>Class Components:</strong>
    <ul>
      <li>
        <p>The <code class="language-plaintext highlighter-rouge">componentDidMount</code> lifecycle method is a popular place to fetch data as it ensures that the component is fully mounted in the DOM before making the request.</p>

        <div class="language-plaintext highlighter-rouge"><div class="highlight"><pre class="highlight"><code>class DataComponent extends React.Component {
  componentDidMount() {
    fetch('/api/data')
      .then(response =&gt; response.json())
      .then(data =&gt; this.setState({ data }));
  }
  // ... rest of the component
}
</code></pre></div>        </div>
      </li>
    </ul>
  </li>
  <li><strong>Functional Components:</strong>
    <ul>
      <li>
        <p>The <code class="language-plaintext highlighter-rouge">useEffect</code> hook is used for side effects, including data fetching, in functional components. To fetch data when the component mounts, you’d use <code class="language-plaintext highlighter-rouge">useEffect</code> with an empty dependency array.</p>

        <div class="language-plaintext highlighter-rouge"><div class="highlight"><pre class="highlight"><code>function DataComponent() {
  const [data, setData] = useState(null);

  useEffect(() =&gt; {
    fetch('/api/data')
      .then(response =&gt; response.json())
      .then(fetchedData =&gt; setData(fetchedData));
  }, []);  // Empty dependency array means this effect runs once after component mounts

  // ... rest of the component
}
</code></pre></div>        </div>
      </li>
    </ul>
  </li>
</ul>

<p>Regardless of the approach, it’s essential to handle loading states, errors, and potential side effects efficiently for a seamless user experience. Libraries like <strong>react-query</strong> and <strong>SWR</strong> can abstract and optimize many of these concerns, simplifying data-fetching patterns in React applications.</p>

<h3 id="what-are-hooks-in-react">What are hooks in React?</h3>

<p>In React, <strong>Hooks</strong> are functions that allow you to “hook into” React state and lifecycle features directly from function components. They were introduced in React 16.8 and enable developers to use state and other React features without having to write class components.</p>

<ul>
  <li><strong>Benefits:</strong>
    <ul>
      <li>Facilitates the creation of cleaner and more readable code.</li>
      <li>Enables better logic encapsulation and reusability.</li>
      <li>Reduces the complexity of components by avoiding the “this” keyword and lifecycle methods.</li>
    </ul>
  </li>
  <li><strong>Common Hooks:</strong>
    <ul>
      <li>
        <p><code class="language-plaintext highlighter-rouge">useState</code>: Allows you to add state to functional components.</p>

        <div class="language-plaintext highlighter-rouge"><div class="highlight"><pre class="highlight"><code>const [count, setCount] = useState(0);
</code></pre></div>        </div>
      </li>
      <li>
        <p><code class="language-plaintext highlighter-rouge">useEffect</code>: Performs side effects (like data fetching, manual DOM manipulation, etc.) in functional components.</p>

        <div class="language-plaintext highlighter-rouge"><div class="highlight"><pre class="highlight"><code>useEffect(() =&gt; {
  document.title = `Count: ${count}`;
}, [count]);
</code></pre></div>        </div>
      </li>
      <li>
        <p><code class="language-plaintext highlighter-rouge">useContext</code>: Accesses the value from a React context without using a Context Consumer.</p>

        <div class="language-plaintext highlighter-rouge"><div class="highlight"><pre class="highlight"><code>const theme = useContext(ThemeContext);
</code></pre></div>        </div>
      </li>
    </ul>
  </li>
  <li><strong>Additional Hooks:</strong> React also offers hooks like <code class="language-plaintext highlighter-rouge">useReducer</code>, <code class="language-plaintext highlighter-rouge">useCallback</code>, <code class="language-plaintext highlighter-rouge">useMemo</code>, <code class="language-plaintext highlighter-rouge">useRef</code>, and <code class="language-plaintext highlighter-rouge">useLayoutEffect</code>, among others.</li>
  <li><strong>Custom Hooks:</strong> You can also create your own hooks, allowing you to extract component logic into reusable functions. Custom hooks are a way to reuse stateful logic, not state itself.</li>
</ul>

<p>Overall, hooks provide a more intuitive way to use React’s features within function components, promoting cleaner and more maintainable code.</p>

<h3 id="if-you-wanted-a-component-to-perform-an-action-only-once-when-the-component-initially-rendered-how-would-you-achieve-it-with-a-function-component">If you wanted a component to perform an action only once when the component initially rendered how would you achieve it with a function component?</h3>

<p>To ensure a function component performs an action only once upon its initial render, you would utilize the <strong>useEffect</strong> hook with an empty dependency array. This ensures that the effect runs only once, similar to the <code class="language-plaintext highlighter-rouge">componentDidMount</code> lifecycle method in class components.</p>

<div class="language-plaintext highlighter-rouge"><div class="highlight"><pre class="highlight"><code>import React, { useEffect } from 'react';

function MyComponent() {
  useEffect(() =&gt; {
    // Action to be performed only on the initial render
    console.log('Component did mount!');

  }, []);  // Empty dependency array ensures this runs once after component mounts

  return (
    &lt;div&gt;
      My Component Content
    &lt;/div&gt;
  );
}
</code></pre></div></div>

<p>By using an empty dependency array in <code class="language-plaintext highlighter-rouge">useEffect</code>, the effect does not re-run after the initial execution since no state or prop values are being watched for changes. This is a common pattern for actions that should only occur once, such as initial data fetching or setting up event listeners.</p>

<h3 id="what-is-prop-drilling-and-how-can-you-avoid-it">What is prop-drilling, and how can you avoid it?</h3>

<p><strong>Prop-drilling</strong>, also known as “prop-threading”, refers to the process of passing data through multiple layers of components (from parent to descendant) via props, even if some intermediary components don’t need the data themselves. This can lead to code that is hard to maintain and trace, especially in deep component hierarchies.</p>

<div class="language-plaintext highlighter-rouge"><div class="highlight"><pre class="highlight"><code>function ParentComponent(props) {
  return &lt;ChildComponent someProp={props.someProp} /&gt;;
}

function ChildComponent(props) {
  return &lt;GrandchildComponent someProp={props.someProp} /&gt;;
}

function GrandchildComponent(props) {
  return &lt;div&gt;{props.someProp}&lt;/div&gt;;
}
</code></pre></div></div>

<p>Here, even though only <code class="language-plaintext highlighter-rouge">GrandchildComponent</code> needs <code class="language-plaintext highlighter-rouge">someProp</code>, it’s being passed through each layer of the hierarchy.</p>

<p><strong>Ways to avoid prop-drilling:</strong></p>

<ul>
  <li>
    <p><strong>Context API:</strong> Use React’s built-in Context API to provide data to components further down the tree.</p>

    <div class="language-plaintext highlighter-rouge"><div class="highlight"><pre class="highlight"><code>const SomeContext = React.createContext();

function ParentComponent(props) {
  return (
    &lt;SomeContext.Provider value={props.someProp}&gt;
      &lt;ChildComponent /&gt;
    &lt;/SomeContext.Provider&gt;
  );
}

function GrandchildComponent() {
  const someProp = React.useContext(SomeContext);
  return &lt;div&gt;{someProp}&lt;/div&gt;;
}
</code></pre></div>    </div>
  </li>
  <li><strong>Component Composition:</strong> Break down complex components and use component composition to avoid passing unnecessary props.</li>
  <li><strong>Redux or other state management libraries:</strong> For larger applications, use state management solutions to manage and distribute your application’s state without prop-drilling.</li>
</ul>

<p>By using these strategies, you can maintain cleaner, more readable, and more efficient React codebases that are less prone to bugs and easier to refactor.</p>

<h3 id="how-can-you-reset-a-components-state-to-its-initial-state">How can you reset a component’s state to its initial state?</h3>

<p>To reset a component’s state to its initial state in React, there are several methods you can employ:</p>

<ul>
  <li>
    <p><strong>Using a Reference:</strong> Store the initial state in a reference and reset the state using that reference.</p>

    <div class="language-plaintext highlighter-rouge"><div class="highlight"><pre class="highlight"><code>import React, { useState, useRef } from 'react';

function MyComponent() {
  const initialState = { count: 0 };
  const [state, setState] = useState(initialState);
  const stateRef = useRef(initialState);

  const resetState = () =&gt; {
    setState(stateRef.current);
  };

  return (
    &lt;div&gt;
      Count: {state.count}
      &lt;button onClick={() =&gt; setState({ count: state.count + 1 })}&gt;Increment&lt;/button&gt;
      &lt;button onClick={resetState}&gt;Reset&lt;/button&gt;
    &lt;/div&gt;
  );
}
</code></pre></div>    </div>
  </li>
  <li>
    <p><strong>Using a Function with useState:</strong> useState can accept a function to provide an initial state. If you encapsulate the initial state logic in a function, you can call it both for setting the initial state and resetting it.</p>

    <div class="language-plaintext highlighter-rouge"><div class="highlight"><pre class="highlight"><code>function MyComponent() {
  const createInitialState = () =&gt; ({ count: 0 });
  const [state, setState] = useState(createInitialState);

  const resetState = () =&gt; {
    setState(createInitialState());
  };

  return (
    &lt;div&gt;
      Count: {state.count}
      &lt;button onClick={() =&gt; setState({ count: state.count + 1 })}&gt;Increment&lt;/button&gt;
      &lt;button onClick={resetState}&gt;Reset&lt;/button&gt;
    &lt;/div&gt;
  );
}
</code></pre></div>    </div>
  </li>
</ul>

<p>Both approaches are valid and can be used based on the specific use case and developer preference. The key is to maintain the initial state’s representation and use it when you want to revert back to it.</p>

<h3 id="explain-the-difference-between-usestate-and-useeffect">Explain the difference between useState and useEffect.</h3>

<p><strong>useState</strong> and <strong>useEffect</strong> are both hooks introduced in React 16.8, but they serve very different purposes:</p>

<ul>
  <li>
    <p><strong>useState:</strong></p>

    <p>This hook allows you to add state to functional components. Before hooks, state could only be used in class components.</p>

    <div class="language-plaintext highlighter-rouge"><div class="highlight"><pre class="highlight"><code>import React, { useState } from 'react';

function Counter() {
  const [count, setCount] = useState(0); // initial value is 0

  return (
    &lt;div&gt;
      {count}
      &lt;button onClick={() =&gt; setCount(count + 1)}&gt;Increment&lt;/button&gt;
    &lt;/div&gt;
  );
}
</code></pre></div>    </div>
  </li>
  <li>
    <p><strong>useEffect:</strong></p>

    <p>This hook is used to perform side effects (like data fetching, DOM manipulation, setting up event listeners, etc.) in functional components. It can mimic the behavior of various lifecycle methods in class components, such as <code class="language-plaintext highlighter-rouge">componentDidMount</code>, <code class="language-plaintext highlighter-rouge">componentDidUpdate</code>, and <code class="language-plaintext highlighter-rouge">componentWillUnmount</code>.</p>

    <div class="language-plaintext highlighter-rouge"><div class="highlight"><pre class="highlight"><code>import React, { useState, useEffect } from 'react';

function DataFetcher() {
  const [data, setData] = useState(null);

  useEffect(() =&gt; {
    fetch('/api/data')
      .then(response =&gt; response.json())
      .then(result =&gt; setData(result));
    // This runs after the component mounts and after every update
  }, []); // The empty array means it will only run once, similar to componentDidMount

  return (
    &lt;div&gt;
      {data}
    &lt;/div&gt;
  );
}
</code></pre></div>    </div>
  </li>
</ul>

<p>In essence:</p>

<ul>
  <li><strong>useState</strong> is for managing local state in functional components.</li>
  <li><strong>useEffect</strong> is for handling side effects in functional components.</li>
</ul>

<p>While both hooks provide essential functionality for modern React development, they cater to different aspects of component logic and behavior.</p>

<h3 id="if-you-have-to-set-a-key-value-in-a-component-from-where-would-you-get-that-value">If you have to set a key value in a component, from where would you get that value?</h3>

<p>In React, a <strong>key</strong> is a special attribute you should provide to elements created dynamically from an array or iterable. It helps React identify which items have changed, been added, or been removed, thus ensuring efficient updates and re-renders. When determining a value for the key:</p>

<ul>
  <li>
    <p><strong>Unique Identifiers:</strong></p>

    <p>Often, the best approach is to use a unique identifier from your data. If the items come from a database, they might have a unique ID.</p>

    <div class="language-plaintext highlighter-rouge"><div class="highlight"><pre class="highlight"><code>const items = [
  { id: 1, name: 'Item 1' },
  { id: 2, name: 'Item 2' },
  // ...
];

return items.map(item =&gt; &lt;div key={item.id}&gt;{item.name}&lt;/div&gt;);
</code></pre></div>    </div>
  </li>
  <li>
    <p><strong>Array Index:</strong></p>

    <p>If there’s no unique identifier, you might consider using the array index. However, this isn’t recommended unless you’re certain the list doesn’t undergo reorder operations (like sort or splice), as it can lead to performance issues and bugs.</p>

    <div class="language-plaintext highlighter-rouge"><div class="highlight"><pre class="highlight"><code>const items = ['Item 1', 'Item 2'];

return items.map((item, index) =&gt; &lt;div key={index}&gt;{item}&lt;/div&gt;);
</code></pre></div>    </div>
  </li>
  <li>
    <p><strong>Generate Unique IDs:</strong></p>

    <p>If you don’t have a natural unique identifier, you can use libraries like <strong>shortid</strong> or <strong>uuid</strong> to generate them.</p>
  </li>
</ul>

<p>Remember, it’s crucial that the key is stable across re-renders for optimal performance. It should not be generated randomly for each render, as this would defeat its purpose.</p>

<h3 id="explain-the-concept-of-lazy-loading-react-components">Explain the concept of lazy loading React components</h3>

<p><strong>Lazy loading</strong> is a technique in React where components are loaded and rendered only when they’re needed (typically when they come into the viewport or upon a particular event) instead of loading them upfront during the initial page load. This strategy can improve the performance and reduce the initial bundle size of your application, leading to faster load times.</p>

<p>React provides a built-in mechanism for lazy loading components using <code class="language-plaintext highlighter-rouge">React.lazy()</code> and <code class="language-plaintext highlighter-rouge">Suspense</code>.</p>

<ul>
  <li>
    <p><strong>React.lazy():</strong></p>

    <p>It allows you to render a dynamic import as a regular component. It automatically takes care of loading the component when it’s needed.</p>

    <div class="language-plaintext highlighter-rouge"><div class="highlight"><pre class="highlight"><code>const LazyLoadedComponent = React.lazy(() =&gt; import('./LazyLoadedComponent'));
</code></pre></div>    </div>
  </li>
  <li>
    <p><strong>Suspense:</strong></p>

    <p>Works in conjunction with <code class="language-plaintext highlighter-rouge">React.lazy()</code> and provides a fallback UI (like a loading spinner) while the component is being loaded.</p>

    <div class="language-plaintext highlighter-rouge"><div class="highlight"><pre class="highlight"><code>import React, { Suspense } from 'react';

function App() {
  return (
    &lt;div&gt;
      &lt;Suspense fallback=&lt;div&gt;Loading...&lt;/div&gt;&gt;
        &lt;LazyLoadedComponent /&gt;
      &lt;/Suspense&gt;
    &lt;/div&gt;
  );
}
</code></pre></div>    </div>
  </li>
</ul>

<p>For scenarios where you’d like to lazy-load components based on the viewport or other conditions, third-party libraries such as <strong>react-loadable</strong> or utilities like <strong>IntersectionObserver</strong> can be leveraged.</p>

<p>In summary, lazy loading React components is a powerful tool for optimizing the performance of your application, ensuring users download only what they need when they need it.</p>

<h3 id="explain-the-main-differences-between-usememo-and-usecallback">Explain the main differences between useMemo and useCallback</h3>

<p><strong>useMemo</strong> and <strong>useCallback</strong> are both React hooks introduced to optimize performance by avoiding unnecessary recalculations and re-renders. While they have similar goals, they’re used in different scenarios:</p>

<ul>
  <li>
    <p><strong>useMemo:</strong></p>

    <p>It returns a <strong>memoized value</strong>. This hook is useful when you have computationally expensive calculations that you don’t want to execute on every render. Instead, you want them to recalculate only when specific dependencies change.</p>

    <div class="language-plaintext highlighter-rouge"><div class="highlight"><pre class="highlight"><code>import React, { useMemo } from 'react';

function Component(props) {
  const computedValue = useMemo(() =&gt; {
    // some expensive calculation based on props.data
    return expensiveCalculation(props.data);
  }, [props.data]);

  return &lt;div&gt;{computedValue}&lt;/div&gt;;
}
</code></pre></div>    </div>
  </li>
  <li>
    <p><strong>useCallback:</strong></p>

    <p>It returns a <strong>memoized callback function</strong>. This hook is particularly useful when passing callbacks to performance-sensitive child components (like those wrapped in <code class="language-plaintext highlighter-rouge">React.memo</code>). By ensuring that the callback function reference remains consistent across renders (unless dependencies change), we prevent unnecessary re-renders of those child components.</p>

    <div class="language-plaintext highlighter-rouge"><div class="highlight"><pre class="highlight"><code>import React, { useCallback } from 'react';

function ParentComponent() {
  const handleChildClick = useCallback(() =&gt; {
    // handle click logic
  }, []); // Empty dependency array means the callback will not change across re-renders

  return &lt;ChildComponent onClick={handleChildClick} /&gt;;
}
</code></pre></div>    </div>
  </li>
</ul>

<p>In essence:</p>

<ul>
  <li><strong>useMemo</strong> is about memoizing values.</li>
  <li><strong>useCallback</strong> is about memoizing functions.</li>
</ul>

<p>Both hooks accept a dependency array, and the provided value or function is recalculated/recreated only when values in this array change between renders.</p>

<h3 id="why-would-you-ever-use-forwardref-in-react">Why would you ever use forwardRef in React?</h3>

<p><strong>forwardRef</strong> in React is a tool for forwarding <strong>refs</strong> (references) to a child component. It is particularly useful in situations where you need to access the DOM elements or instance methods of a child component from a parent component. Here are some primary use cases:</p>

<ul>
  <li>
    <p><strong>Focus Management:</strong></p>

    <p>Often in user interfaces, after certain actions are completed, you might need to set focus on a particular child element for accessibility and usability purposes.</p>
  </li>
  <li>
    <p><strong>Animating Components:</strong></p>

    <p>When using libraries like <strong>gsap</strong> or <strong>anime.js</strong>, you might need direct access to the DOM node to perform animations.</p>
  </li>
  <li>
    <p><strong>Integration with Third-party Libraries:</strong></p>

    <p>Some external libraries require direct access to DOM nodes, and forwarding refs can be essential in these scenarios.</p>
  </li>
  <li>
    <p><strong>Reusable Components:</strong></p>

    <p>If you’re building a component library, you might use <strong>forwardRef</strong> to ensure components are extensible and can pass along refs when needed.</p>
  </li>
</ul>

<div class="language-plaintext highlighter-rouge"><div class="highlight"><pre class="highlight"><code>import React, { forwardRef } from 'react';

const CustomInput = forwardRef((props, ref) =&gt; {
  return &lt;input ref={ref} {...props} /&gt;;
});

function App() {
  const inputRef = React.useRef(null);

  const handleButtonClick = () =&gt; {
    // Focus the input when the button is clicked
    inputRef.current.focus();
  };

  return (
    &lt;div&gt;
      &lt;CustomInput ref={inputRef} /&gt;
      &lt;button onClick={handleButtonClick}&gt;Focus Input&lt;/button&gt;
    &lt;/div&gt;
  );
}
</code></pre></div></div>

<p>As shown above, <strong>forwardRef</strong> allows the parent component (<code class="language-plaintext highlighter-rouge">App</code> in this case) to access the underlying <code class="language-plaintext highlighter-rouge">input</code> DOM node of the <code class="language-plaintext highlighter-rouge">CustomInput</code> child component.</p>

<h3 id="at-what-point-does-the-useeffect-cleanup-function-run">At what point does the useEffect cleanup function run?</h3>

<p>The <strong>useEffect</strong> hook in React provides a way to execute side effects (like setting up event listeners, fetching data, or subscribing to external sources) in functional components. Additionally, <strong>useEffect</strong> allows for a <strong>cleanup function</strong> which is used to undo these side effects and prevent potential memory leaks or unwanted behaviors.</p>

<p>The cleanup function of <strong>useEffect</strong> runs:</p>

<ul>
  <li>Before the component is unmounted from the DOM, ensuring any setup done in the effect is properly cleaned up.</li>
  <li>Before re-running the effect when one of its dependencies has changed. This ensures that any previous effect is cleaned up before the new effect is run.</li>
</ul>

<div class="language-plaintext highlighter-rouge"><div class="highlight"><pre class="highlight"><code>import React, { useState, useEffect } from 'react';

function ExampleComponent() {
  const [count, setCount] = useState(0);

  useEffect(() =&gt; {
    // Side effect: Setting up an event listener
    const handleDocumentClick = () =&gt; {
      console.log('Document was clicked!');
    };
    document.addEventListener('click', handleDocumentClick);

    // Cleanup function
    return () =&gt; {
      // Cleaning up the event listener
      document.removeEventListener('click', handleDocumentClick);
    };
  }, [count]); // This effect depends on the 'count' state
}
</code></pre></div></div>

<p>In the example above:</p>

<ul>
  <li>When <code class="language-plaintext highlighter-rouge">count</code> changes, before the new effect is executed, the cleanup function will run, removing the previous event listener.</li>
  <li>If the <code class="language-plaintext highlighter-rouge">ExampleComponent</code> is unmounted from the DOM, the cleanup function will also run, ensuring that the event listener is removed and preventing potential memory leaks.</li>
</ul>

<p>In essence, the cleanup function is React’s way of ensuring that side effects don’t leave behind unwanted behaviors or resources.</p>

<h3 id="explain-the-concept-of-reducers-and-context-in-react">Explain the concept of Reducers and Context in React</h3>

<p>Both <strong>Reducers</strong> and <strong>Context</strong> are powerful concepts in React, often used in tandem to manage global state and pass data throughout components without prop-drilling. Let’s dive into each concept separately:</p>

<h4 id="reducers">Reducers</h4>

<p>A <strong>reducer</strong> is a pure function that takes the current state and an action, then returns the next state. It follows the concept of the reducer in functional programming, where it “reduces” a collection to a single value. In the context of React (and state management libraries like Redux), reducers are used to handle state transitions in a predictable manner.</p>

<div class="language-plaintext highlighter-rouge"><div class="highlight"><pre class="highlight"><code>function counterReducer(state, action) {
  switch (action.type) {
    case 'INCREMENT':
      return { count: state.count + 1 };
    case 'DECREMENT':
      return { count: state.count - 1 };
    default:
      return state;
  }
}
</code></pre></div></div>

<p>In this example, the <code class="language-plaintext highlighter-rouge">counterReducer</code> adjusts the <code class="language-plaintext highlighter-rouge">count</code> based on the provided action type.</p>

<h4 id="context">Context</h4>

<p>The <strong>Context</strong> API provides a way to pass data through the component tree without having to pass props down manually at every level. It is designed to share data that can be considered “global”, such as themes, user authentication, or other shared utilities.</p>

<div class="language-plaintext highlighter-rouge"><div class="highlight"><pre class="highlight"><code>import React, { createContext, useContext } from 'react';

// Create a Context
const ThemeContext = createContext();

function App() {
  return (
    &lt;ThemeContext.Provider value="dark"&gt;
      &lt;ChildComponent /&gt;
    &lt;/ThemeContext.Provider&gt;
  );
}

function ChildComponent() {
  // Use the Context value
  const theme = useContext(ThemeContext);
  return &lt;div&gt;Current theme is: {theme}&lt;/div&gt;
}
</code></pre></div></div>

<p>In the example, the <code class="language-plaintext highlighter-rouge">ChildComponent</code> can access the theme value without receiving it as a direct prop, thanks to the Context API.</p>

<p><strong>Together:</strong> These two concepts can be combined using the <code class="language-plaintext highlighter-rouge">useReducer</code> hook and the Context API to create a global state management solution. The reducer handles state logic and transitions, while the Context API distributes the state and functions to manipulate it throughout the component tree.</p>

<h3 id="how-would-you-catch-render-errors-in-react-components-at-the-global-scope">How would you catch render errors in React components at the global scope?</h3>

<p>To catch render errors in React components at the global scope, you would use a feature called <strong>Error Boundaries</strong>. An error boundary is a React component that catches JavaScript errors anywhere in their child component tree, logs those errors, and displays a fallback UI instead of the component tree that crashed.</p>

<h4 id="creating-an-error-boundary">Creating an Error Boundary</h4>

<p>You can define an error boundary by creating a new component with the static method <strong>getDerivedStateFromError()</strong> and/or the instance method <strong>componentDidCatch()</strong>.</p>

<div class="language-plaintext highlighter-rouge"><div class="highlight"><pre class="highlight"><code>import React, { Component } from 'react';

class ErrorBoundary extends Component {
  constructor(props) {
    super(props);
    this.state = { hasError: false };
  }

  static getDerivedStateFromError(error) {
    // Update state so the next render will show the fallback UI
    return { hasError: true };
  }

  componentDidCatch(error, errorInfo) {
    // You can log the error to an error reporting service here
    console.error(error, errorInfo);
  }

  render() {
    if (this.state.hasError) {
      // You can render any custom fallback UI here
      return &lt;h1&gt;Something went wrong.&lt;/h1&gt;;
    }
    return this.props.children;
  }
}
</code></pre></div></div>

<h4 id="using-the-error-boundary">Using the Error Boundary</h4>

<p>Once you have an error boundary defined, you can wrap your entire application (or parts of it) inside this boundary.</p>

<div class="language-plaintext highlighter-rouge"><div class="highlight"><pre class="highlight"><code>function App() {
  return (
    &lt;ErrorBoundary&gt;
      &lt;MainComponent /&gt;
    &lt;/ErrorBoundary&gt;
  );
}
</code></pre></div></div>

<p>If any error occurs inside <code class="language-plaintext highlighter-rouge">MainComponent</code> or any of its children, the error boundary will catch it and display the fallback UI, ensuring that the entire application doesn’t crash due to a single component’s failure.</p>

<p>Note: Error boundaries only catch errors in the components below them in the tree, not within themselves. Therefore, it’s a good practice to place them at a high level in your component hierarchy, or around critical sections of your app.</p>

<h3 id="how-does-useeffect-check-changes-in-its-array-dependency">How does useEffect check changes in its array dependency?</h3>

<p>The <strong>useEffect</strong> hook in React triggers side-effects in function components. One of its features is the dependency array, which you can provide to ensure that the effect runs only when the specified dependencies have changed between renders.</p>

<p><strong>useEffect</strong> determines whether to re-run its effect based on a shallow comparison of the values inside the dependency array from the previous render to the current render.</p>

<h4 id="shallow-comparison">Shallow Comparison</h4>

<p>A shallow comparison checks if the values at corresponding indexes of the dependency array are the same between consecutive renders. It does not dive into nested objects or arrays, but checks only the top-level references. Here’s a breakdown:</p>

<ul>
  <li><strong>Primitives:</strong> For primitive values (like numbers, strings, or booleans), it checks if they are the same.</li>
  <li><strong>Objects and Arrays:</strong> For objects and arrays, it checks the reference, not the content. If you create a new object or array every render, even with the same content, it will cause the effect to run every time.</li>
</ul>

<div class="language-plaintext highlighter-rouge"><div class="highlight"><pre class="highlight"><code>const [count, setCount] = React.useState(0);

// This effect will run on every render,
// because a new array is created every time
useEffect(() =&gt; {
  console.log('This will run every render');
}, [count, []]);

// This effect will run only when 'count' changes,
// as the dependency array contains only primitive values
useEffect(() =&gt; {
  console.log('This will run when count changes');
}, [count]);
</code></pre></div></div>

<p>It’s crucial to ensure that objects or arrays passed to the dependency array have stable identities across renders, especially if their contents aren’t changing. Otherwise, it could lead to unnecessary effect runs. Using state setters, useMemo, or useCallback can help maintain stable object or function references across renders.</p>
]]></content>
  </entry>
  <entry xml:lang="en">
    <title type="html">Meet ConsultaLa: The Legal Tech start-up erasing labor law bureaucracy</title>
    <link href="https://montedelgallo.com/blog/meet-consultala-the-legal-tech-start-up-erasing-labor-law-bureaucracy/" rel="alternate" type="text/html" title="Meet ConsultaLa: The Legal Tech start-up erasing labor law bureaucracy" />
    <published>2022-10-31T09:47:15+00:00</published>
    <updated>2022-10-31T09:47:15+00:00</updated>
    <id>https://montedelgallo.com/blog/meet-consultala-the-legal-tech-start-up-erasing-labor-law-bureaucracy/</id>
    <author>
      <name>Giovanni Panasiti</name>
    </author>
    <category term="products" />
    <summary type="html">Today we introduce ConsultaLa: a toolkit of software and digital services to boost and streamline the workday of labor law professionals through automation and state-of-the-art technology.</summary>
    <content type="html" xml:base="https://montedelgallo.com/blog/meet-consultala-the-legal-tech-start-up-erasing-labor-law-bureaucracy/"><![CDATA[<figure class="post__fig"><img src="https://montedelgallo.com/assets/img/blog/consultala-logo.webp" srcset="/assets/img/blog/consultala-logo-480.webp 480w, /assets/img/blog/consultala-logo.webp 657w" sizes="(min-width: 860px) 780px, calc(100vw - 40px)" alt="ConsultaLa logo" width="657" height="101" loading="lazy" decoding="async" /></figure>

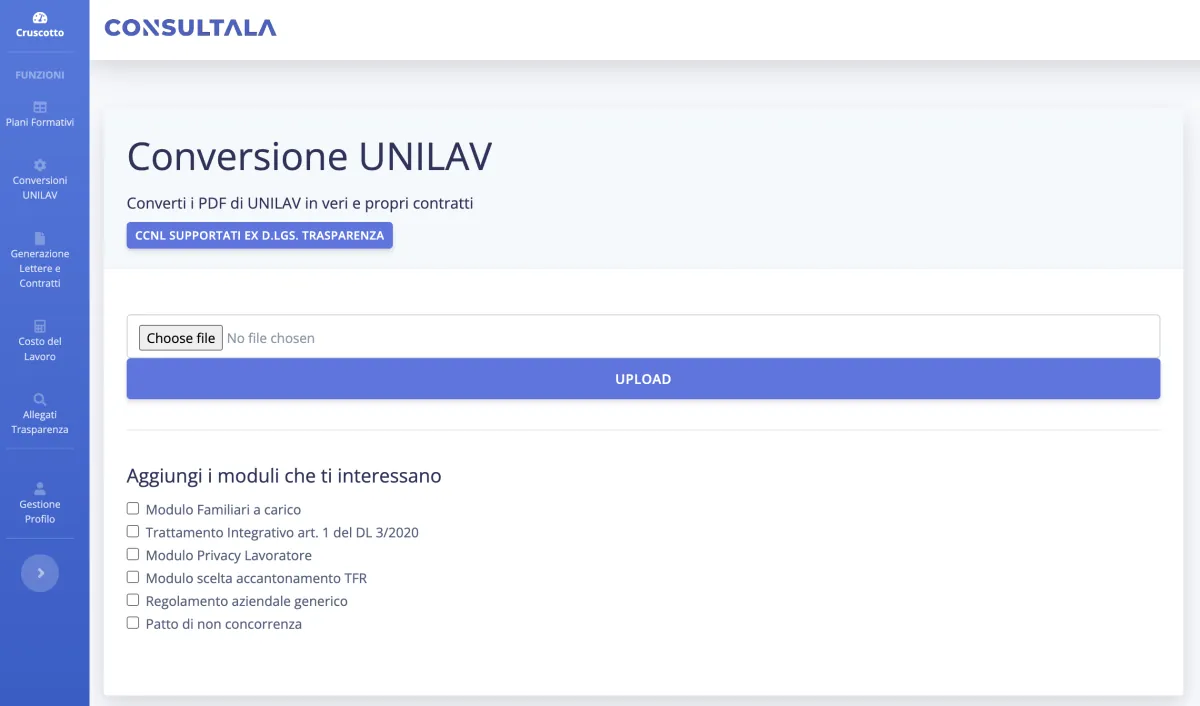
<p>MdG is the technology engine behind a few bootstrapped products and start-ups employing technology to solve problems and make life easy. Today we introduce <a href="https://consultala.com/">ConsultaLa</a>: a toolkit of software and digital services to boost and streamline the workday of labor law professionals through automation and state-of-the-art technology.</p>

<figure class="post__fig"><img src="https://montedelgallo.com/assets/img/blog/consultala-unilav.webp" srcset="/assets/img/blog/consultala-unilav-480.webp 480w, /assets/img/blog/consultala-unilav-800.webp 800w, /assets/img/blog/consultala-unilav.webp 1200w" sizes="(min-width: 860px) 780px, calc(100vw - 40px)" alt="A ConsultaLa screen for converting UNILAV PDF files, with a file upload field and a list of modules to add" width="1200" height="706" loading="lazy" decoding="async" /></figure>

<h2 id="legal-documents-an-expensive-inefficient-and-low-value-added-task">Legal documents: An expensive, inefficient, and low value-added task</h2>

<p>Over the course of your life, you will meet bureaucracy for several possible reasons and will seek professional help to produce formal documents and acts. The production of simple documents (letters, contracts…) is the entry point and backbone for every legal and accounting support, but it’s a low value-added task, that sum up to around two hours per day for a professional, spent away from higher value-added tasks. To cover for this waste of time, professionals charge high prices for the generation and management of such documents, while wasting their time on these low-value-added tasks. Nobody is happy.</p>

<figure class="post__fig"><img src="https://montedelgallo.com/assets/img/blog/consultala-team-at-work.webp" srcset="/assets/img/blog/consultala-team-at-work-480.webp 480w, /assets/img/blog/consultala-team-at-work-800.webp 800w, /assets/img/blog/consultala-team-at-work.webp 1200w" sizes="(min-width: 860px) 780px, calc(100vw - 40px)" alt="Two developers at their desks in a bright room, one facing a large wall-mounted monitor" width="1200" height="902" loading="lazy" decoding="async" /></figure>

<h2 id="a-skyrocketing-prototype-to-automate-the-world-of-labor-law">A skyrocketing prototype to automate the world of labor law</h2>

<p>We started with low-hanging fruits and developed a cloud-based platform that employs carefully designed algorithms to produce legally vetted documents at the speed of a click so that the public can get their immediate needs served faster and cheaper, and professionals can focus only on the real value adds.</p>

<figure class="post__fig"><img src="https://montedelgallo.com/assets/img/blog/consultala-growth-charts.webp" srcset="/assets/img/blog/consultala-growth-charts-480.webp 480w, /assets/img/blog/consultala-growth-charts-800.webp 800w, /assets/img/blog/consultala-growth-charts.webp 1200w" sizes="(min-width: 860px) 780px, calc(100vw - 40px)" alt="Two line charts of ConsultaLa usage over time, both rising steeply" width="1200" height="568" loading="lazy" decoding="async" /></figure>

<p>In two years, ConsultaLa fostered the creation of a community of over a thousand digital-savvy professionals across Italy, generating over five hundred documents per day. What makes us excited, is that the production of each one of these over 45,000 documents cut the bureaucracy for someone who – for example – was able to start their new job a few days earlier.</p>

<h2 id="consultala-a-hotbed-of-digital-transformation-in-the-world-of-labor-law">ConsultaLa: A hotbed of digital transformation in the world of labor law</h2>

<p>ConsultaLa’s team combines decades of experience in technology and legal services. MdG provides software development, product strategy, and data analytics expertise, while the rest of the team is composed of a lawyer, a licensed labor law consultant, and a professional accountant with decades of experience in the tax and legal consultancy business. ConsultaLa’s team lives and breathes law and bureaucracy, as well as technology and software development.</p>

<figure class="post__fig"><img src="https://montedelgallo.com/assets/img/blog/consultala-whiteboard.webp" srcset="/assets/img/blog/consultala-whiteboard-480.webp 480w, /assets/img/blog/consultala-whiteboard-800.webp 800w, /assets/img/blog/consultala-whiteboard.webp 1200w" sizes="(min-width: 860px) 780px, calc(100vw - 40px)" alt="A developer at a whiteboard covered with a colour-coded plan" width="1200" height="902" loading="lazy" decoding="async" /></figure>

<p>In 2021, ConsultaLa was selected to participate in the first cohort of the Foundersboost pre-acceleration program in Europe, allowing us to refine the vision and business model. We brought ConsultaLa from a sketch on a whiteboard to a successful business with steadily growing revenues and a passionate base of cheering customers. We are just only started: ConsultaLa is after every waste of time, with a brimming pipeline of digital services to set people free from bureaucracy distortions.</p>

<figure class="post__fig"><img src="https://montedelgallo.com/assets/img/blog/consultala-group-selfie.webp" srcset="/assets/img/blog/consultala-group-selfie-480.webp 480w, /assets/img/blog/consultala-group-selfie-800.webp 800w, /assets/img/blog/consultala-group-selfie.webp 1200w" sizes="(min-width: 860px) 780px, calc(100vw - 40px)" alt="Five men smiling in a group selfie under string lights" width="1200" height="986" loading="lazy" decoding="async" /></figure>
]]></content>
  </entry>
  <entry xml:lang="en">
    <title type="html">Welcome, Marco Cherubini!</title>
    <link href="https://montedelgallo.com/blog/welcome-marco-cherubini/" rel="alternate" type="text/html" title="Welcome, Marco Cherubini!" />
    <published>2022-10-31T08:00:52+00:00</published>
    <updated>2022-10-31T08:00:52+00:00</updated>
    <id>https://montedelgallo.com/blog/welcome-marco-cherubini/</id>
    <author>
      <name>Giovanni Panasiti</name>
    </author>
    <category term="team" />
    <summary type="html">Today we welcome Marco, who joins us as a junior developer, bringing his passion and eagerness to learn together with a creative background in producing Hip-Hop music.</summary>
    <content type="html" xml:base="https://montedelgallo.com/blog/welcome-marco-cherubini/"><![CDATA[<p>With autumn brimming with exciting new projects, it was about time that the MdG family expanded with a new hire! Today we welcome Marco, who joins us as a junior developer. Marco brings his passion and eagerness to learn, together with a creative background in producing Hip-Hop music. We are truly excited to see what this collaboration will bring to our team and our clients!</p>

<figure class="post__fig"><img src="https://montedelgallo.com/assets/img/blog/marco-cherubini-portrait.webp" alt="Portrait of Marco Cherubini in black and white" width="481" height="640" loading="lazy" decoding="async" /></figure>

<p>Meet Marco:</p>

<blockquote>
  <p>“Hi, my name is Marco and I am a web developer and a professional Hip-Hop Lofi beats producer.</p>

  <p>I’m particular interested in making things aesthetically and musically enjoyable for a great user experience. I think my passion for music, and for composing it, really helps me having the most creative solutions to any kind of request or problem.</p>

  <p>I try to keep up with security and best practices, and am always looking for new things to learn!</p>

  <p>Now, I’m very thrilled to start with the Mdg to face new challanges with a young and international team.”</p>
</blockquote>
]]></content>
  </entry>
  <entry xml:lang="en">
    <title type="html">Welcome, Mouaz El Molkey!</title>
    <link href="https://montedelgallo.com/blog/welcome-mouaz-el-molkey/" rel="alternate" type="text/html" title="Welcome, Mouaz El Molkey!" />
    <published>2022-10-01T09:15:16+00:00</published>
    <updated>2022-10-01T09:15:16+00:00</updated>
    <id>https://montedelgallo.com/blog/welcome-mouaz-el-molkey/</id>
    <author>
      <name>Giovanni Panasiti</name>
    </author>
    <category term="team" />
    <summary type="html">Our pipeline is brimming with exciting tech projects, so we are growing our team of software engineers with a new entry: Mouaz El Molkey.</summary>
    <content type="html" xml:base="https://montedelgallo.com/blog/welcome-mouaz-el-molkey/"><![CDATA[<p>Summer is gone, fall is upon us, and our pipeline is brimming with excited tech projects to start from scratch, or bring to the next level! That’s why we are growing our team of software engineers with a new entry: Mouaz El Molkey.</p>

<p>With a background in accounting, Mouaz has been following his passion for coding and technology since when he was in middle school (sounds familiar!). We are beyond excited to welcome Mouaz in the team, and cannot wait to see where this new addition will bring the team.</p>

<figure class="post__fig"><img src="https://montedelgallo.com/assets/img/blog/mouaz-el-molkey-at-work.webp" srcset="/assets/img/blog/mouaz-el-molkey-at-work-480.webp 480w, /assets/img/blog/mouaz-el-molkey-at-work-800.webp 800w, /assets/img/blog/mouaz-el-molkey-at-work.webp 1200w" sizes="(min-width: 860px) 780px, calc(100vw - 40px)" alt="Mouaz at his laptop, seen from behind" width="1200" height="800" loading="lazy" decoding="async" /></figure>

<h2 id="meet-mouaz">Meet Mouaz</h2>

<p>“My name is Mouaz El Molkey, I’m a software developer specializing in web development. I graduated from Damascus University with a bachelor’s degree in Accounting, my Career journey start as an Accountant and I pretty much enjoyed working in this sector.</p>

<p>However, I had a passion for programming since I was in middle school, so meanwhile studying Accounting I started learning the basics of programming by myself. In the beginning, I learned (HTML, CSS, and PHP) and I landed my first job as WordPress Developer in 2018. I really enjoyed working as a Developer so It made me feel I needed more, so I started my bachelor’s degree in Computer Science at University of People &amp; I joined Microvese school where I learned (JavaScript, React, Redux, Ruby, Rails).</p>

<p>I like to spend most of my free time reading and learning new things in technology and non-technology, in addition to that I like to hit the gym every day to take care of my physical health because “A sound mind in a sound body”</p>

<p>Now, I’m glad I will have the chance to work with such a nice team in MdG and learning new things from them, looking forward to it.”</p>
]]></content>
  </entry>
  <entry xml:lang="en">
    <title type="html">Software development done right – the MdG way</title>
    <link href="https://montedelgallo.com/blog/software-development-done-right-the-mdg-way/" rel="alternate" type="text/html" title="Software development done right – the MdG way" />
    <published>2022-09-06T09:17:39+00:00</published>
    <updated>2022-09-06T09:17:39+00:00</updated>
    <id>https://montedelgallo.com/blog/software-development-done-right-the-mdg-way/</id>
    <author>
      <name>Giovanni Panasiti</name>
    </author>
    <category term="story" />
    <summary type="html">We love working at MdG, because the way we work is the way we think, and feel. Over the years, we shaped our software development process through research and trial and error.</summary>
    <content type="html" xml:base="https://montedelgallo.com/blog/software-development-done-right-the-mdg-way/"><![CDATA[<p>We love working at MdG, because the way we work is the way we think, and feel. Over the years, we shaped our software development process through research and trial and error, trying to maximize the feelings we love, and remove the ones we hate.</p>

<p>Among the feelings we love most: the “thrill of solving” when we get to the bottom of a complex conundrum to achieve perfection and precision; the strive to accept challenges and push to go the extra mile; the joy of removing the unnecessary to find simplicity; the smoothness of turning clunky and convoluted into linear and clear.</p>

<p>Among the feelings we can’t stand: Wasting time in endless meetings; troubleshooting issues when it’s too late; developing something incomplete, or unnecessary.</p>

<p>With experience, we found that the best clients to work with love the same feelings we love, and hate the same feelings we hate. That’s why we put them in the driving seat with us, at every stage: to ensure our clients feel the same feelings as our devs when our product is as brilliant as we all pictured in our minds – and whiteboards!</p>

<p>We are often asked how we manage projects, so here are our golden rules to build something cool while having a great time. This is what you should expect, if you embark in developing a piece of software with us:</p>

<h2 id="1-we-you-and-us-co-design-and-co-develop-for-real">1. We (you and us) Co-Design and Co-Develop. For real.</h2>

<p>We know how software development goes: You have an idea, we transform it in requirements, we didn’t really get it 100% right, you hadn’t really had it 100% figured out, requirements change, scope change, the project goes over expected time, nobody is happy.</p>

<p>Instead, we want everybody to be happy, so we changed the paradigm, and we include you, the client, in our development team. If you are embarking on a project with us, expect to be part of the team.</p>

<p>First of all, you’ll be on short, to the point, screen-share calls every two weeks. But that’s not enough. You’ll be in the office with us. Modern technology made communication really easy, so that there’s no point to delay deliverables and check-ins.</p>

<p>Collaboration platforms allow us to be in no office and in many offices at the same time. If we are co-designing and co-developing, then this means that you should sit in the same room where we bang our heads on the wall to make our app work exactly as we want.</p>

<p>You’ll be able to see all of our discussions, questions, doubts, real time and will be able to be tagged in questions, so we can remove roadblocks as soon as they appear, not at reviews. No more arguing between client teams and development teams: we are one team.</p>

<h2 id="2-we-test-our-code-and-take-accountability-for-real">2. We test our code and take accountability. For real.</h2>

<figure class="post__fig"><img src="https://montedelgallo.com/assets/img/blog/mdg-way-test.webp" srcset="/assets/img/blog/mdg-way-test-480.webp 480w, /assets/img/blog/mdg-way-test-800.webp 800w, /assets/img/blog/mdg-way-test.webp 1200w" sizes="(min-width: 860px) 780px, calc(100vw - 40px)" alt="Workers in yellow helmets climbing a tall steel structure against a blue sky" width="1200" height="801" loading="lazy" decoding="async" /></figure>

<p>Because we hate wasting time troubleshooting issues when it’s too late, we believe in obsessive, precise testing. We test each and every line of our code, using state-of-the-art technologies and international best practices.</p>

<p>Why is this important for us? A well tested code it’s easier to maintain and easier to extend with new features. It allows us to develop stress-free, hedging the risk of unexpected outcomes when the project scales or changes. We learned that developing a software product is rarely like baking a cake following grandma’s recipe. More often, we find ourselves brewing something that evolves and scales with a certain degree of unexpectedness, that needs management. Solid testing is paramount to reduce complexity and make sure we feel comfortable when the unexpected comes up.</p>

<p>Why is this important for our clients? With every release, our client can feel that nice feeling of something that grows from strong foundations. For incremental deliveries to be truly incremental, we all should feel fully comfortable that the next step builds upon and enhance the previous one. Our clients know that when we deliver a piece of code, we take accountability for that product, and for how it works.</p>

<p>This should be a very basic concept and should be given for granted. However, too often this is not what happens in real life, where time and money constraints push devs to deliver fast, taking risks no one should take. This is why we – once again – include client staff in our testing process. If we co-design, we co-test. The key concept is that there’s no black box, where we disappear for a week to test our code and the client doesn’t see visible improvements. The project team caters for testing time upfront, and the value of it is clearly explained and agreed upon, so we can guarantee the highest quality within the required time frame.</p>

<p>As much as possible, we strive to act on a test-driven approach: this means that we write the test cases even before writing the code. The test cases themselves help us – client and devs – to have an overview of the software and how it will work. Once the tests are ready, we start writing the right code for those test cases to be fulfilled.</p>

<p>If you read this far, chances are you are as passionate about shipping good quality innovation as we are: We’d love to hear from you! How do you develop your software? What does software development done right mean for you? Feel free to reach out and let us know what you think of the above, we are always on the lookout for learning opportunities!</p>
]]></content>
  </entry>
  <entry xml:lang="en">
    <title type="html">How I Started Creating a Product a Month Just For Fun</title>
    <link href="https://montedelgallo.com/blog/how-i-started-creating-a-product-a-month-just-for-fun/" rel="alternate" type="text/html" title="How I Started Creating a Product a Month Just For Fun" />
    <published>2022-09-06T09:10:36+00:00</published>
    <updated>2022-09-06T09:10:36+00:00</updated>
    <id>https://montedelgallo.com/blog/how-i-started-creating-a-product-a-month-just-for-fun/</id>
    <author>
      <name>Giovanni Panasiti</name>
    </author>
    <category term="story" />
    <summary type="html">In these last 4 months of 2019 I’ve tried to create a product each month and everything began thanks to Robin Good. He was my first mentor back in the first years of the 2000s.</summary>
    <content type="html" xml:base="https://montedelgallo.com/blog/how-i-started-creating-a-product-a-month-just-for-fun/"><![CDATA[<p>In these last 4 months of 2019 I’ve tried to create a product each month and everything began thanks to <a href="https://robingood.com/">Robin Good</a>. He was my first mentor back in the first years of the 2000s. I was younger and hungry to learn, he was willing to teach, that was an easy match.</p>

<p>I’ve kept in contact with Robin and back in March 2019 he came to me with this idea to build a “tool” each month for his Patreon subscribers. I was worried at first but then I started to think this could be a perfect chance to go deeper into nowadays’ front-end development tools. I’ve worked for years now on the backend side of this business and never took time to improve frontend skills. So, why not?</p>

<p>So I’ve started this journey. I’m still on it and actually on the ending of the 4th project. I’ve incredibly increased my skill and knowledge on React which I’m really falling in love with.</p>

<h2 id="the-products">The Products</h2>

<h3 id="1-social-media-formatter--march-2019">1) Social Media Formatter — March 2019</h3>

<p>This was the first project and it is a frontend-only project. The need was to write a simple textbox area where people could write and format their content with whitespaces and break lines as much as they want and these whitespaces should have been yet there when they paste their content on social media like Instagram.</p>

<figure class="post__fig"><img src="https://montedelgallo.com/assets/img/blog/product-a-month-social-media-formatter.webp" srcset="/assets/img/blog/product-a-month-social-media-formatter-480.webp 480w, /assets/img/blog/product-a-month-social-media-formatter-800.webp 800w, /assets/img/blog/product-a-month-social-media-formatter.webp 1200w" sizes="(min-width: 860px) 780px, calc(100vw - 40px)" alt="Social Media Formatter: a dark page with a text box and formatting options" width="1200" height="587" loading="lazy" decoding="async" /></figure>

<p><a href="https://smf.robingood.com/">https://smf.robingood.com/</a></p>

<h3 id="2-iconbox--april-2019">2) IconBox — April 2019</h3>

<p>The second project was still a frontend-only thing. It is a webpage with emoji chosen between the thousands now available and grouped by category. A user just need to click on one to have it copied in his clipboard. There is also a “Favorite” category where the user can find all the emoji he uses more often, being only a single page application with no backend the favourites are stored in local storage, therefore, a user can find his favourites unless he doesn’t change browser.</p>

<figure class="post__fig"><img src="https://montedelgallo.com/assets/img/blog/product-a-month-iconbox.webp" srcset="/assets/img/blog/product-a-month-iconbox-480.webp 480w, /assets/img/blog/product-a-month-iconbox-800.webp 800w, /assets/img/blog/product-a-month-iconbox.webp 1200w" sizes="(min-width: 860px) 780px, calc(100vw - 40px)" alt="IconBox: a grid of emoji to copy" width="1200" height="589" loading="lazy" decoding="async" /></figure>

<p><a href="https://ib.robingood.com/">https://ib.robingood.com/</a></p>

<h3 id="3-habtrack--may-2019">3) HabTrack — May 2019</h3>

<p>In May we began this project which is essentially a visual daily habit tracker. It is built on a Nodejs framework for the backend and Reactjs for the frontend. Users can add a goal and track it day by day simply clicking on it. It is actually free for everyone to use.</p>

<p>We started with some sketching to figure out how the interface should have looked like and how the database should have been designed. Once I had everything figured out I started coding.</p>

<figure class="post__fig"><img src="https://montedelgallo.com/assets/img/blog/product-a-month-habtrack-sketches.webp" srcset="/assets/img/blog/product-a-month-habtrack-sketches-480.webp 480w, /assets/img/blog/product-a-month-habtrack-sketches-800.webp 800w, /assets/img/blog/product-a-month-habtrack-sketches.webp 1200w" sizes="(min-width: 860px) 780px, calc(100vw - 40px)" alt="Hand-drawn wireframes of HabTrack in a notebook, annotated in red" width="1200" height="600" loading="lazy" decoding="async" /></figure>

<p>There weren’t anything particularly difficult. The only challenging part was to render the calendar how it is rendered now. I initially looked into some libraries to render a calendar with SVG in the way <a href="https://github.com">Github</a> shows “<em>contributions</em>” but I didn’t find any to fit our needs, so I ended up making it from scratch and I’m pretty happy with the result.</p>

<figure class="post__fig"><img src="https://montedelgallo.com/assets/img/blog/product-a-month-habtrack.webp" srcset="/assets/img/blog/product-a-month-habtrack-480.webp 480w, /assets/img/blog/product-a-month-habtrack-800.webp 800w, /assets/img/blog/product-a-month-habtrack.webp 1200w" sizes="(min-width: 860px) 780px, calc(100vw - 40px)" alt="HabTrack: a table of daily habits with coloured cells for the days done" width="1200" height="588" loading="lazy" decoding="async" /></figure>

<p><code class="language-plaintext highlighter-rouge">http://habtrack.robingood.com/</code></p>

<h3 id="4-checklistbuilder--july-2019">4) ChecklistBuilder — July 2019</h3>

<p>This was the project for June but it kinda went out of hand so it’s still in the making and will be done by July. The basic feature will be to allow users to create checklists and add a description to each checklist’s item. Users will be able to share their checklists with other users.</p>

<figure class="post__fig"><img src="https://montedelgallo.com/assets/img/blog/product-a-month-checklistbuilder-sketches.webp" srcset="/assets/img/blog/product-a-month-checklistbuilder-sketches-480.webp 480w, /assets/img/blog/product-a-month-checklistbuilder-sketches-800.webp 800w, /assets/img/blog/product-a-month-checklistbuilder-sketches.webp 1200w" sizes="(min-width: 860px) 780px, calc(100vw - 40px)" alt="Pencil wireframes on squared paper for sharing a checklist: a share button, a pop-up form and a shared-with-you page" width="1200" height="600" loading="lazy" decoding="async" /></figure>

<p>As always the project started with a lot of audio messages between me and Robin and some sketches. It took time to design the backend and the database in the best possible way. I’ve had a lot of fun playing around with <a href="https://reactjs.org/">react</a> implementing some cool feature like “drag and drop” which I’ve never done before.</p>

<figure class="post__fig"><img src="https://montedelgallo.com/assets/img/blog/product-a-month-checklistbuilder.webp" srcset="/assets/img/blog/product-a-month-checklistbuilder-480.webp 480w, /assets/img/blog/product-a-month-checklistbuilder-800.webp 800w, /assets/img/blog/product-a-month-checklistbuilder.webp 1200w" sizes="(min-width: 860px) 780px, calc(100vw - 40px)" alt="ChecklistBuilder: a list of steps on the left and a rich-text editor on the right" width="1200" height="578" loading="lazy" decoding="async" /></figure>

<p><code class="language-plaintext highlighter-rouge">http://checklistbuilder.robingood.com/</code></p>
]]></content>
  </entry>
  <entry xml:lang="en">
    <title type="html">Welcome, Claudio Aiello!</title>
    <link href="https://montedelgallo.com/blog/welcome-claudio-aiello/" rel="alternate" type="text/html" title="Welcome, Claudio Aiello!" />
    <published>2021-11-29T09:08:45+00:00</published>
    <updated>2021-11-29T09:08:45+00:00</updated>
    <id>https://montedelgallo.com/blog/welcome-claudio-aiello/</id>
    <author>
      <name>Giovanni Panasiti</name>
    </author>
    <category term="team" />
    <summary type="html">Our second hire of the month, Claudio Aiello joins MdG today, bringing to the team his passion for classical music and beautiful software.</summary>
    <content type="html" xml:base="https://montedelgallo.com/blog/welcome-claudio-aiello/"><![CDATA[<p>Our second hire of the month, Claudio Aiello joins MdG today, bringing to the team his passion for classical music and beautiful software.</p>

<p>A professional musician, Claudio is the mastermind behind <a href="https://www.dancla.app/">Dancla</a>, a mobile app fully dedicated to online violin classes. We can’t wait to collaborate with Claudio on our software and mobile development projects, and get enriched by his creativity and peculiar perspective.</p>

<figure class="post__fig"><img src="https://montedelgallo.com/assets/img/blog/claudio-aiello-portrait.webp" srcset="/assets/img/blog/claudio-aiello-portrait-480.webp 480w, /assets/img/blog/claudio-aiello-portrait-800.webp 800w, /assets/img/blog/claudio-aiello-portrait.webp 1200w" sizes="(min-width: 860px) 780px, calc(100vw - 40px)" alt="Portrait of Claudio Aiello looking at the camera against a black background" width="1200" height="1190" loading="lazy" decoding="async" /></figure>

<h2 id="meet-claudio">Meet Claudio</h2>

<p>“I’m Claudio Aiello, I’m a software engineer and professional cellist.<br />
My two passions are music and technology and I consider myself very lucky to have made my passions a job because “if you do what you love, you’ll never work a day in your life”.</p>

<p>Before the pandemics, I worked mainly as a cellist in many orchestras around the world but the global lockdown situation made me think and I decided to begin a new journey: I started working as a developer of web and mobile platforms and I published, in collaboration with my brother, my first app: Dancla.</p>

<p>Now I am very excited to start with MdG to face new challenges together with a young and international team.”</p>
]]></content>
  </entry>
</feed>